July 28, 2014 New I’ve got sunshine on a cloudy day
The weather today has been nothing short of gloomy. With harsh thunderstorms last night, the temperature today has tapered off drastically, and grey clouds have been hanging in the sky ever since. In an attempt to bring some color to the lifeless conditions outside, I did what I do best: cook up something colorful. This salad is so delicious, and definitely packs a substantial crunch.

Thai Crunch Salad – Jennifer Segal of Once Upon a Chef
Ingredients
For the Thai Peanut Dressing
- 1/4 cup creamy peanut butter
- 2 tablespoons unseasoned rice vinegar
- 2 tablespoons fresh lime juice, from one lime
- 3 tablespoons vegetable oil
- 1 tablespoon soy sauce
- 2 tablespoons honey
- 2-1/2 tablespoons sugar
- 2 garlic cloves, roughly chopped
- 1-inch square piece fresh ginger, peeled and roughly chopped
- 1 teaspoon salt
- 1/4 teaspoon crushed red pepper flakes
- 2 tablespoons fresh cilantro leaves
For the Salad
- 4 cups chopped Napa cabbage or shredded coleslaw mix (I like to toss in a little shredded red cabbage for color)
- 1 cup prepared shredded carrots
- 1 red bell pepper, thinly sliced into bite-sized pieces
- 1 small English cucumber, halved lengthwise, seeded and thinly sliced
- 1 cup cooked and shelled edamame
- 2 medium scallions, thinly sliced
- 1/2 cup loosely packed chopped fresh cilantro
Instructions
- For the dressing, combine all of the ingredients except for the cilantro in a blender and process until completely smooth. Add the cilantro and blend for a few seconds until the cilantro is finely chopped. Refrigerate until ready to serve.
- For the salad, combine all of the ingredients in a large bowl and toss to combine. If serving right away, drizzle the peanut dressing over top and toss; otherwise, serve the dressing on the side so the salad doesn’t get soggy.
Share this:

Tags: asian, cilantro, crunchy, gluten free, healthy, peanut, salad, slaw, thai, vegetarian
July 23, 2014 This calls for a celebration


For those of you who don’t know, I just spent the past five weeks at my TFA Institute in Chicago, which means many grueling days of lectures, long nights spent lesson planning, and more cafeteria food than I could stomach. However, I was so surprised that in spite of the hard work and less-than-ideal living conditions, my institute experience ended up surpassing my expectations in many ways. Over the course of the past five weeks, I made so many incredible friendships and was so proud of the strides that my 26 “zesty” 6th graders made. Now that I’m home, I’ve decided to celebrate (in BHTB fashion, of course) with homemade Hot Fudge Cream Puffs. Yum!

Cream Puffs: King Arthur Flour
Ingredients:
1 cup water
1/2 cup (8 tablespoons) unsalted butter
3/8 teaspoon salt
1 1/4 cups King Arthur Unbleached All-Purpose Flour
4 large eggs
Directions:
1) Preheat the oven to 425°F. Lightly grease (or line with parchment) two baking sheets.
2) Combine the water, butter, and salt in a medium-sized saucepan, heat until the butter has melted, and bring to a rolling boil.
3) Remove the pan from the heat, and add the flour all at once, stirring vigorously.
4) Return the pan to the burner and cook over medium heat, stirring all the while, until the mixture smooths out and follows the spoon around the pan; this should take less than a minute.
5) Remove the pan from the heat, and let the mixture cool for 5 to 10 minutes. It’ll still feel hot, but you should be able to hold a finger in it for a few seconds.
6) Transfer the mixture to a mixer, and beat in the eggs one at a time; it’ll look curdled at first, but when you add the last egg it should become smooth. Beat for at least 2 minutes after adding the last egg.
7) Using a generously filled tablespoon cookie scoop, or a level muffin scoop, drop the thick batter onto the prepared baking sheets in 3- to 4-tablespoon mounds. Space the mounds about 3″ apart, to allow for expansion.
8) Bake the pastries for 15 minutes, then reduce the oven temperature to 350°F and bake for an additional 25 minutes, until pastries are a medium golden brown. Don’t open the oven door while the pastries are baking.
9) Remove the pastries from the oven. Make a small slit in the top of each, and return them to the oven for 5 minutes, to allow the steam to escape. Place them on a rack to cool. When they’re cool enough to handle, split each in half to make top and bottom pieces; splitting and exposing the centers to air will help keep them from becoming soggy.
Share this:

Tags: choux, cream puff, dessert, hot fudge, ice cream, profiterole, sundae
- Leave a comment
- Posted under Sweet
April 24, 2014 Famously Easy
I made this tomato sauce about a month ago with no intention of posting it to my blog (hence the sparse and unartistic photo display). It is quite honestly one of the easiest things I’ve ever made, so I was hesitant to share, however I decided I couldn’t keep this 4-ingredient recipe a secret any longer.

What I realized after a quick Google search, however, is that this recipe isn’t so secret — it’s actually pretty famous. This recipe is one of many by Marcella Hazan, an Italian cooking legend. Upon her death, this recipe exploded onto the internet food scene, and even made its way into the New York Times (where I found the recipe). It is so simple and delicious, that I can’t even think of making another tomato sauce. Because the sauce is a little rich (there’s quite a lot of butter…) I served mine over Spaghetti Squash (which was great!) although I’m sure it’s pretty hard to beat real pasta.

Marcella Hazan’s Tomato Sauce – The New York Times
INGREDIENTS
- 2 cups tomatoes, with their juices (for example, a 28-ounce can of San Marzano whole peeled tomatoes)
- 5 tablespoons butter
- 1 onion, peeled and cut in half
- Salt
PREPARATION
- 1. Combine the tomatoes, their juices, the butter and the onion halves in a saucepan. Add a pinch or two of salt.
- 2. Place over medium heat and bring to a simmer. Cook, uncovered, for about 45 minutes. Stir occasionally, mashing any large pieces of tomato with a spoon. Add salt as needed.
- 3. Discard the onion before tossing the sauce with pasta. This recipe makes enough sauce for a pound of pasta.
Share this:

Tags: easy italian food, italian, italian cooking, italian food, marcella hazan, pasta sauce, tomato, tomato sauce, weeknight dinners
- Leave a comment
- Posted under Savory
April 22, 2014 Chopped
Earlier this year I suffered a cooking “accident” — doesn’t sound so unexpected, being that I’m an avid cook and baker. However, I did not slice my finger while meticulously chopping vegetables, or burn myself while taking a delicious batch of cookies out of the oven; instead, I cut my hand open while trying to separate two frozen veggie burgers. It was pretty disastrous, but I definitely learned my lesson about handling sharp knives (so much so, that I shied away from cutting anything for several weeks…). Now that my hand is totally healed and I’ve regained confidence in the kitchen, I’m back to chopping. This recipe provided a great opportunity to hone my knife skills, as there is a TON of chopping. It sort of takes a while to make, if you’re a timid chopper like myself, but prep time aside, this salad is DELICIOUS and lasts for 4-5 days in the refrigerator (totally worth it…). I follow the recipe pretty much to the letter, however I have experimented with adding chopped fresh jalapeno, and if you like a little kick, I DEFINITELY recommend that addition.  Superfood Black Bean & Quinoa Salad Recipe – Elizabeth Rider Ingredients:
- 2 cups cooked quinoa (1 cup dry quinoa yields about 2 cups cooked)
- 1/2 cup extra virgin olive oil (*I prefer to use less, closer to 1/3 cup)
- 1 teaspoon ground cumin
- 1 clove garlic, pressed, grated or finely chopped
- Juice of one lime (about 2 tablespoons) — DON’T SKIMP ON THIS
- 1 teaspoon fine sea salt
- 1/4 teaspoon cayenne pepper (optional for heat)
- 1 15 ounce can black beans, rinsed and drained well
- 1 red bell pepper, quarter inch chopped (about 1 cup)
- 6 green onions, root removed, white and part of the greens chopped (about 1 cup)
- 1 handful of cilantro, rough chopped (about 1/3 cup)
Directions: Prepare the quinoa. While the quinoa is cooking, whisk the olive oil, cumin, garlic, lime, salt and cayenne (if using) together in the bottom of a large bowl to let the flavors marry while you chop the veggies. Rinse and drain the black beans, then chop the veggies; the key is to make the peppers and onions about the same size as the beans. Add the cooked quinoa, beans and veggies to the bowl and gently fold it all together with the dressing. The quinoa can be warm, room temp, or cold when you make the dish. Regardless, I suggest letting it chill in the refrigerator at least 30 minutes to let the flavors come together. It tastes best served room temperature or chilled.
Share this:

Tags: black bean, healthy, omega 3, quinoa, salad, superfood, vegan, vegetarian
- Leave a comment
- Posted under Savory
April 20, 2014 Slow as Molasses
“Senioritis” has hit pretty hard this semester — I’ve often joked that I’m “as slow as molasses” lately.

Though it’s been a little tricky to stay motivated with graduation quickly approaching and the beautiful spring weather we’ve been experiencing, finals are still around the corner and there are many late nights at the library still ahead. I don’t know about you, but study snacks help my concentration infinitely — however, I wanted to make something that wouldn’t leave me feeling completely guilty and sugar-high.

And thus, I recently made Vegan Molasses Cookies — they’re excellent. They’re chewy and spicy, and taste best when completely cool (if you can wait that long, haha).

- ⅓ c. Earth Balance, melted
- ½ c. sugar
- ¼ c. brown sugar, packed
- ⅓ c. blackstrap molasses
- 2 t. vanilla extract
- 2 T. soy milk
- 2 c. all-purpose flour
- 1 t. ginger
- 1 t. cinnamon
- ½ t. cloves
- ½ t. allspice
- 2 t. baking soda
- In a medium sized mixing bowl, cream together the vegan butter and sugars with an electric mixer until smooth and well blended.
- Add the molasses, vanilla, and milk and beat until the mixture is very smooth.
- In a separate bowl, whisk together the remaining ingredients.
- Pour the dry ingredients into the wet and mix just until everything is well combined.
- Cover the dough with plastic wrap and refrigerate for an hour.
- When you’re ready to shape the cookies, preheat the oven to 350 degrees.
- Remove the dough from the refrigerator and use a cookie scoop or large spoon to measure out about a tablespoon or so of dough for each cookie. Roll each scoop of dough into a smooth ball with your hands and roll in additional sugar if desired.
- Place the balls onto lightly greased baking sheets and bake for 8-10 minutes, or until the surface of the cookies have nicely cracked.
Share this:

Tags: cookies, dessert, ginger, ginger cookies, healthy, molasses, molasses cookies, vegan, vegan cookies, vegan desserts
- Leave a comment
- Posted under Cookies, Sweet
April 18, 2014 Conscious Uncoupling
I suppose it’s old news at this point, but one of my favorite celebrity couples, Gwyneth Paltrow and Chris Martin, has split — or “consciously uncoupled” in the famous words of Gwyneth, herself. Shortly after I heard the news, I began bookmarking countless GOOP recipes, and stumbled upon these Cannellini Bean and Quinoa Burgers. Like Gwyneth’s relationship with Chris, I’ve been trying to split from meat, eating a plant-based diet whenever possible.

These Cannellini Bean and Quinoa Burgers are a perfect “meatless monday” option — they’re easy, delicious, and totally satisfying. I opted to serve mine with some sliced avocado on top, and I highly recommend that pairing. Enjoy!

Cannellini Bean + Quinoa Burgers – Goop
Ingredients:
- 1 1/2 cups (or small can) cooked cannellini beans
- 1 cup cooked quinoa
- 1/4 cup gluten-free breadcrumbs
- 2 shallots, diced
- 1 garlic clove, minced
- 1/2 teaspoon fennel, crushed
- 2 teaspoons cumin
- healthy handful of parsley, chopped
- olive oil
- salt + pepper
Instructions:
1. Place a large frying pan over medium high heat and drizzle with olive oil (about 2 tablespoons). Add shallots and cook for a minute until they begin to soften. Add garlic, fennel and cumin and cook for another minute until the herbs are aromatic and the garlic softens. Remove from heat and cool.
2. Place the beans, quinoa and breadcrumbs in a large mixing bowl. Add the parsley and cooled shallot mixture and set the pan aside but don’t clean (you’ll use this later to fry the patties). Combine everything together with your hands, mashing the beans so that the mixture turns into a paste. (If it’s feeling a little wet, add more breadcrumbs.) Season with salt and pepper.
3. When combined, form the mixture into small patties, about the size of your palm and about an inch thick.
4. Place your frying pan back on the stove over medium high heat and add a drizzle of olive oil to coat. Cook the patties in batches for about 3 minutes on each side until nice and golden brown. Remove from pan and immediately season with salt and a drizzle of lemon. Serve with lettuce, tomato, red onion, Veganaise and/or whatever else you like.
Share this:

Tags: cannellini bean, conscious uncoupling, gluten free, goop, Gwyneth Paltrow, meatless, meatless monday, quinoa, vegan, vegetarian, veggie burgers
- Leave a comment
- Posted under Savory
April 5, 2014 Totally Rawsome
When it comes to grocery shopping, I’m definitely an impulsive buyer. I walk through every aisle, even though I know exactly what I need going in, and always leave with a bag full of ingredients for which I have no true purpose; this purchase was no exception.

With my box of Cacao Butter in tow, I began “hitting the books” and trying to find a recipe.
When I stumbled upon these raw, vegan almond joy bars, I couldn’t help but squeal with delight — they were exactly the sweet treat that I needed.
These are definitely healthier than the variety you would find at the drugstore, but they are so satisfying — I’m totally converted.
RAW NO BAKE ALMOND JOY CANDY — Courtesy of A Simply Raw Life (With one modification)
Makes about 12 pieces
INGREDIENTS
For the filling:
1 1/2 cups dried unsweetened coconut
2 tbsp coconut oil
2 pitted dates
3 tbsp maple syrup (*I used 2 tablespoons, and combined with the sweetness of the dates, it was definitely sweet enough)
1 tsp vanilla
pinch salt
For the coating:
1/3 cup cacao butter, warmed until melted
1/3 cup raw cacao powder
2 tbsp maple syrup
Pinch sea salt
DIRECTIONS
In a food processor, process all filling ingredients till well combined. It will be a little wet, but they will stick together well once you chill it.. Shape the filling into twelve mini bit size rectangles. Place them on a parchment lined baking pan and refrigerate for 30 minutes.
Set up a double boiler, using a medium sized mixing bowl. Melt the cacao butter, then whisk in the cacao powder, syrup, and sea salt.
Take each mini coconut bar and dip it into the chocolate coating, quickly placing it back on the parchment. Return them to the fridge for 10-15 minutes, or until one coating has set. Repeat the process again, so that each has a double coat.
Return them to the fridge for another 15 minutes, or more to let them set. When ready to serve, let them sit outside the fridge for about 10-15 minutes.
Share this:

Tags: almond, almond joy, chocolate, coconut, dessert, healthy dessert, raw, raw dessert, vegan, vegan dessert
- 3 comments
- Posted under Chocolate, Sweet
November 23, 2013 “Fall”ing for this healthy indulgence

Fall is undoubtedly my favorite season. Typically, each fall brings visions of beautifully colored leaves, cool, crisp air, and the delightful smells of caramel apples and pumpkin spice everything. This fall, however, I was also awaiting what seemed to be the biggest decision of my life, so far — would I be accepted to Teach for America? Much stress ensued, and anyone in my “inner circle” knows that baking has always been my stress relief — so one thoughtful friend brought over the ingredients to make these healthfully indulgent fall treats (Thanks Julie!). I’m proud to share that I was accepted (!!!) and was lucky enough to celebrate with these delicious pumpkin cinnamon rolls.
Pumpkin Cinnamon Rolls (Vegan and Lower Calorie) – Modern Mom
Yields: 6 pumpkin cinnamon rolls
Ingredients:
Dough:
- 1 cup whole wheat pastry flour
- 2 tsp. baking powder
- ½ tsp. baking soda
- ¼ tsp. salt
- 2 Tbsp. vegan butter spread, room temperature, plus more for greasing pan
- ¼ cup Almond milk
- ½ tsp. apple cider vinegar
- ¼ cup + 2 Tbsp. pumpkin puree
Filling:
- 1 Tbsp. vegan butter spread, melted
- ¼ cup brown sugar
- 1 ½ Tbsp. pumpkin pie spice
Frosting:
- ½ cup powdered sugar
- 1 Tbsp. vegan butter spread, room temperature
- Seeds from 1 vanilla bean
- 1 ½ tsp. almond milk, plus more if needed to reach desired consistency
Directions:
Preheat oven to 400 degrees F.
Line a cake pan with parchment paper, grease paper and pan with vegan butter spread to prevent sticking.
In a medium bowl, whisk together dry ingredients: flour, baking powder, baking soda, and salt. Set aside.
In a large mixing bowl, blend vegan butter spread, pumpkin puree, almond milk and vinegar until smooth.
Add the dry ingredients to the mixing bowl, half at a time; gently mix until combined being careful not to over mix the dough.
On a generously floured surface (flour the rolling pin too!) roll the dough into a rectangle ¼ inch thick. Cut the edges of the dough with a pastry cutter or knife into fairly straight lines. The approximate size of the rectangle should be 8 inches wide, by 14 inches long, and ¼ inch thickness.
In a small bowl mix together the brown sugar and pumpkin pie spice.
In another small bowl, melt 1 Tbsp. of vegan butter spread, and brush evenly over the top of the dough.
Sprinkle the sugar spice mixture over the dough, leaving a ½ inch border along all sides of the dough.
Starting on a smaller side of the rectangle, the 8 inch side; gently roll the dough into a log. Cut into 6 equal size pieces.
Place cinnamon rolls into the greased cake pan.
Bake for approximately 16 minutes.
Meanwhile, prepare the vanilla bean frosting. Mix together the powdered sugar and earth balance.
Cut a vanilla bean in half lengthwise. Use a knife to scrap out the seeds of each half, placing the seeds into the mixing bowl. Add 1 tsp. of almond milk and mix until seeds are evenly distributed throughout the frosting. Add ½ tsp. at a time of almond milk until you reach the desired consistency. I like the frosting on the thick side so I only did that one time.
When the pumpkin cinnamon rolls are done baking, spread the frosting evenly over the tops of each roll, and serve.
*Tip: Reheating cinnamon rolls for leftovers takes about 10 seconds in the microwave.
Share this:

Tags: cinnamon rolls, healthy desserts, lower calorie, pumpkin, vegan
- Leave a comment
- Posted under Sweet
September 1, 2013 An Apple a Day…

With classes starting on Tuesday, and the Jewish New Year following shortly afterward, I couldn’t think of a more relevant ingredient to include in my baking this weekend than the apple. This apple cake was so delicious — sweet in the best of ways and homey in every sense of the word!
Mom’s Apple Cake — Smitten Kitchen
Ingredients:
- 6 apples, Mom uses McIntosh apples
- 1 tablespoon cinnamon
- 5 tablespoons sugar
- 2 3/4 cups flour, sifted
- 1 tablespoon baking powder
- 1 teaspoon salt
- 1 cup vegetable oil
- 2 cups sugar
- 1/4 cup orange juice
- 2 1/2 teaspoons vanilla
- 4 eggs
- 1 cup walnuts, chopped (optional)
Directions:
- Preheat oven to 350 degrees. Grease a tube pan. Peel, core and chop apples into chunks. Toss with cinnamon and sugar and set aside.
- Stir together flour, baking powder and salt in a large mixing bowl. In a separate bowl, whisk together oil, orange juice, sugar and vanilla. Mix wet ingredients into the dry ones, then add eggs, one at a time. Scrape down the bowl to ensure all ingredients are incorporated.
- Pour half of batter into prepared pan. Spread half of apples over it. Pour the remaining batter over the apples and arrange the remaining apples on top. Bake for about 1 1/2 hours, or until a tester comes out clean.
Share this:

Tags: apple cake, fruit desserts, jewish dessert, smitten kitchen
- Leave a comment
- Posted under Cake, Sweet
June 10, 2013 Guilty or Guilt-Free?
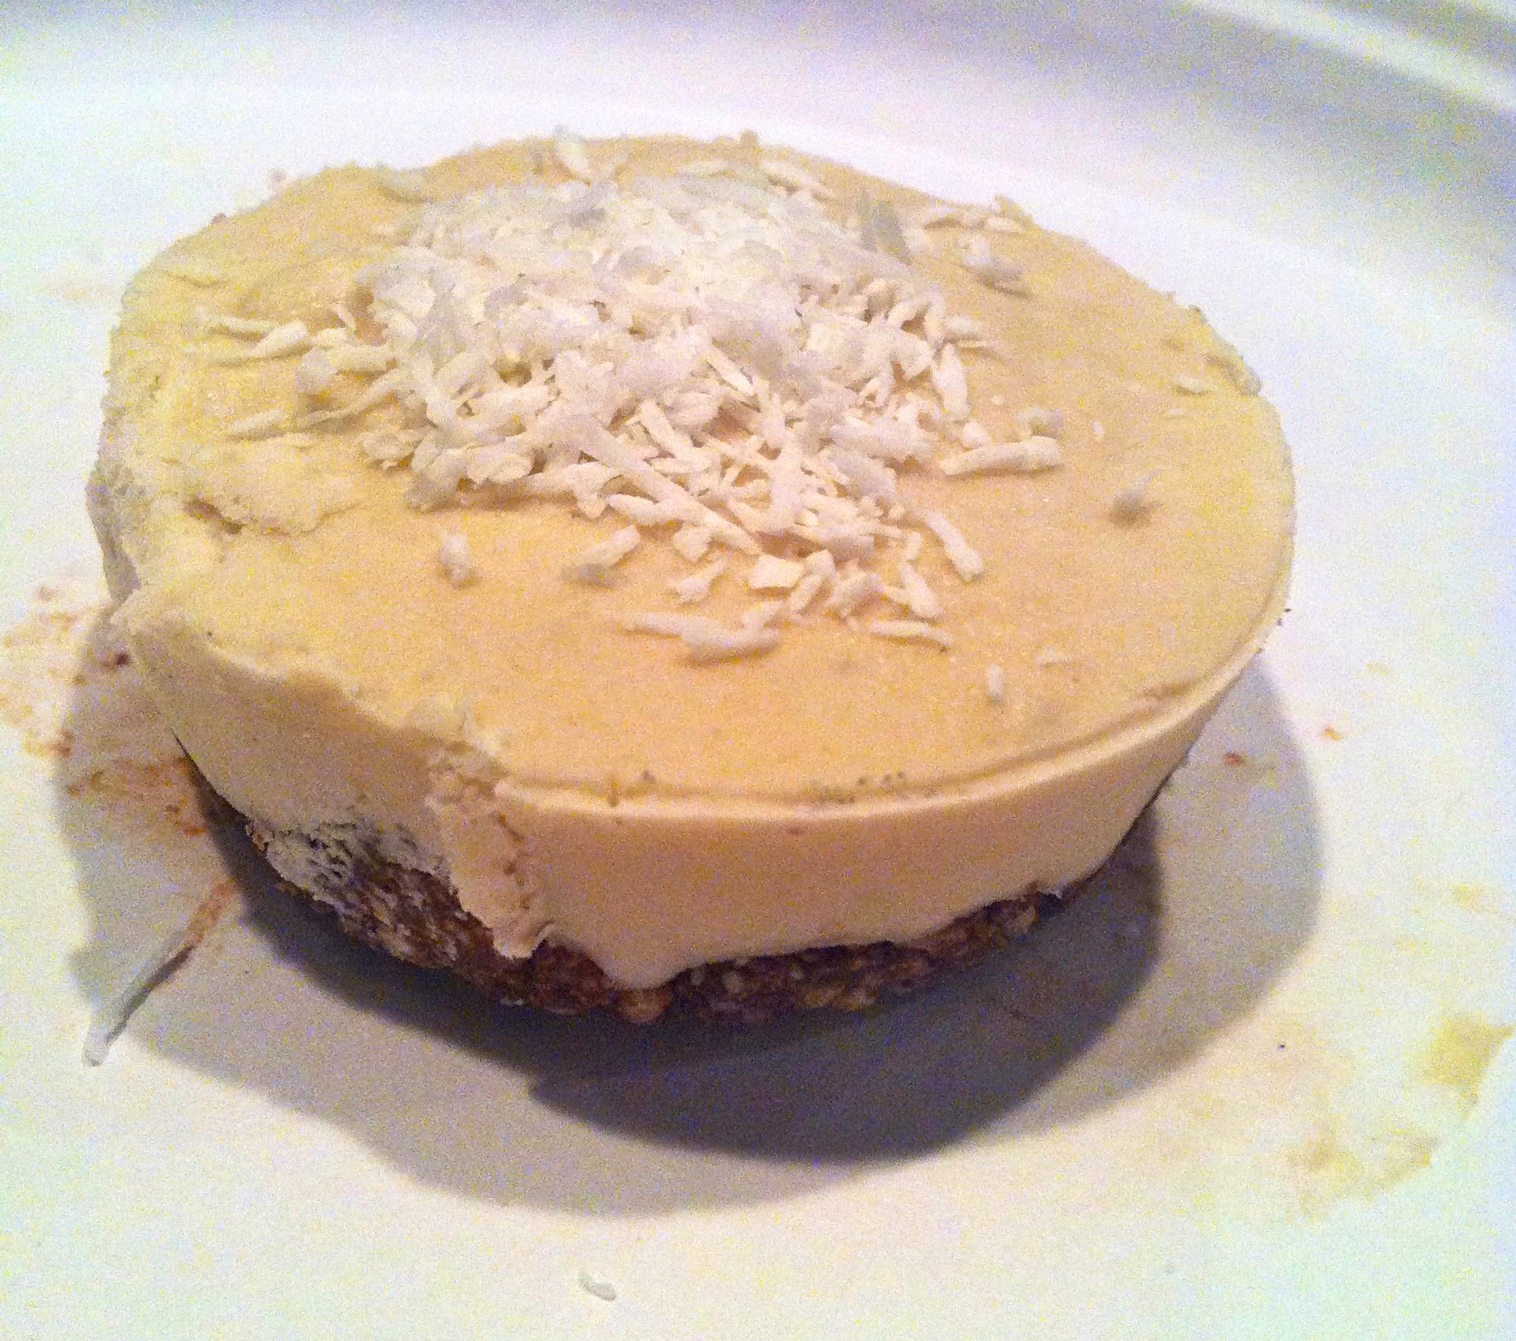
This past week has been filled with celebrations for my family. My younger sister went to Prom and graduated from high school, and my older sister celebrated her birthday. With these celebrations came lots of fun, family time, and most importantly… food. To get “back on track” after everyone’s diets were derailed, I decided to prepare a guilt-free dessert to satisfy any sweet tooth in a healthy way. These personal-sized raw coconut cream pies are every bit as delicious as the “real deal” but left us feeling nourished and satisfied! Although the recipe says to defrost the pies, we all enjoyed them most when eaten frozen — they taste almost like ice cream sandwiches!
Raw Coconut Cream Pie with Dark Chocolate Crust
Prep time: 10 Minutes
Yield: Makes 12 Personal Size Pies
Crust Ingredients:
- 1/2 Cup Raw Cashews or Macadamia Nuts
- 1/2 Cup Shredded Plain Coconut
- 1 Tbsp Coconut Oil
- 2 Tbsp Agave
- 2 Tbsp Cocoa
- Dash of Salt
Filling Ingredients:
- 1 1/4 Cup Coconut Cream (*Refrigerate a can of coconut milk for 24-48 hours and skim thick, white milk from the top, leaving remaining oil at bottom of can)
- 1/2 Cup Coconut Oil
- 3-4 Tbsp Agave
- 1 Banana
- 1/4 Tsp Salt
- 1 Tsp Vanilla Extract
Directions:
- Place crust ingredients in your food processor and blend until smooth.
- Spray a muffin tin with a healthy, non-stick cooking spray.
- Evenly press dough down into muffin tin.
- Place in the freezer.
- Place all filling ingredients in a separate food processor bowl (or washed bowl) and blend until smooth.
- Remove crust from freezer.
- Evenly top crust with coconut cream filling.
- Place in the freezer and let set for 2-3 hours.
- Remove from freezer and let thaw for 10-15 minutes before serving (depending on the texture you choose).
- Feel free to top these with coconut whipped cream and/or shredded coconut.
Share this:

Tags: coconut cream pie, dairy free, gluten free, grain free, healthy, no-bake, raw, soy free, vegan
- 3 comments
- Posted under Pie, Sweet

