Tag Archives: dessert
July 23, 2014 This calls for a celebration


For those of you who don’t know, I just spent the past five weeks at my TFA Institute in Chicago, which means many grueling days of lectures, long nights spent lesson planning, and more cafeteria food than I could stomach. However, I was so surprised that in spite of the hard work and less-than-ideal living conditions, my institute experience ended up surpassing my expectations in many ways. Over the course of the past five weeks, I made so many incredible friendships and was so proud of the strides that my 26 “zesty” 6th graders made. Now that I’m home, I’ve decided to celebrate (in BHTB fashion, of course) with homemade Hot Fudge Cream Puffs. Yum!

Cream Puffs: King Arthur Flour
Ingredients:
1 cup water
1/2 cup (8 tablespoons) unsalted butter
3/8 teaspoon salt
1 1/4 cups King Arthur Unbleached All-Purpose Flour
4 large eggs
Directions:
1) Preheat the oven to 425°F. Lightly grease (or line with parchment) two baking sheets.
2) Combine the water, butter, and salt in a medium-sized saucepan, heat until the butter has melted, and bring to a rolling boil.
3) Remove the pan from the heat, and add the flour all at once, stirring vigorously.
4) Return the pan to the burner and cook over medium heat, stirring all the while, until the mixture smooths out and follows the spoon around the pan; this should take less than a minute.
5) Remove the pan from the heat, and let the mixture cool for 5 to 10 minutes. It’ll still feel hot, but you should be able to hold a finger in it for a few seconds.
6) Transfer the mixture to a mixer, and beat in the eggs one at a time; it’ll look curdled at first, but when you add the last egg it should become smooth. Beat for at least 2 minutes after adding the last egg.
7) Using a generously filled tablespoon cookie scoop, or a level muffin scoop, drop the thick batter onto the prepared baking sheets in 3- to 4-tablespoon mounds. Space the mounds about 3″ apart, to allow for expansion.
8) Bake the pastries for 15 minutes, then reduce the oven temperature to 350°F and bake for an additional 25 minutes, until pastries are a medium golden brown. Don’t open the oven door while the pastries are baking.
9) Remove the pastries from the oven. Make a small slit in the top of each, and return them to the oven for 5 minutes, to allow the steam to escape. Place them on a rack to cool. When they’re cool enough to handle, split each in half to make top and bottom pieces; splitting and exposing the centers to air will help keep them from becoming soggy.
Share this:

Tags: choux, cream puff, dessert, hot fudge, ice cream, profiterole, sundae
- Leave a comment
- Posted under Sweet
April 20, 2014 Slow as Molasses
“Senioritis” has hit pretty hard this semester — I’ve often joked that I’m “as slow as molasses” lately.

Though it’s been a little tricky to stay motivated with graduation quickly approaching and the beautiful spring weather we’ve been experiencing, finals are still around the corner and there are many late nights at the library still ahead. I don’t know about you, but study snacks help my concentration infinitely — however, I wanted to make something that wouldn’t leave me feeling completely guilty and sugar-high.

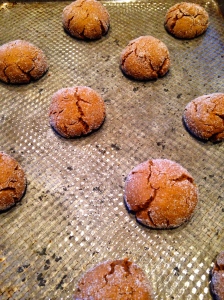
And thus, I recently made Vegan Molasses Cookies — they’re excellent. They’re chewy and spicy, and taste best when completely cool (if you can wait that long, haha).
- ⅓ c. Earth Balance, melted
- ½ c. sugar
- ¼ c. brown sugar, packed
- ⅓ c. blackstrap molasses
- 2 t. vanilla extract
- 2 T. soy milk
- 2 c. all-purpose flour
- 1 t. ginger
- 1 t. cinnamon
- ½ t. cloves
- ½ t. allspice
- 2 t. baking soda
- In a medium sized mixing bowl, cream together the vegan butter and sugars with an electric mixer until smooth and well blended.
- Add the molasses, vanilla, and milk and beat until the mixture is very smooth.
- In a separate bowl, whisk together the remaining ingredients.
- Pour the dry ingredients into the wet and mix just until everything is well combined.
- Cover the dough with plastic wrap and refrigerate for an hour.
- When you’re ready to shape the cookies, preheat the oven to 350 degrees.
- Remove the dough from the refrigerator and use a cookie scoop or large spoon to measure out about a tablespoon or so of dough for each cookie. Roll each scoop of dough into a smooth ball with your hands and roll in additional sugar if desired.
- Place the balls onto lightly greased baking sheets and bake for 8-10 minutes, or until the surface of the cookies have nicely cracked.
Share this:

Tags: cookies, dessert, ginger, ginger cookies, healthy, molasses, molasses cookies, vegan, vegan cookies, vegan desserts
- Leave a comment
- Posted under Cookies, Sweet
April 5, 2014 Totally Rawsome
When it comes to grocery shopping, I’m definitely an impulsive buyer. I walk through every aisle, even though I know exactly what I need going in, and always leave with a bag full of ingredients for which I have no true purpose; this purchase was no exception.

With my box of Cacao Butter in tow, I began “hitting the books” and trying to find a recipe.
When I stumbled upon these raw, vegan almond joy bars, I couldn’t help but squeal with delight — they were exactly the sweet treat that I needed.
These are definitely healthier than the variety you would find at the drugstore, but they are so satisfying — I’m totally converted.
RAW NO BAKE ALMOND JOY CANDY — Courtesy of A Simply Raw Life (With one modification)
Makes about 12 pieces
INGREDIENTS
For the filling:
1 1/2 cups dried unsweetened coconut
2 tbsp coconut oil
2 pitted dates
3 tbsp maple syrup (*I used 2 tablespoons, and combined with the sweetness of the dates, it was definitely sweet enough)
1 tsp vanilla
pinch salt
For the coating:
1/3 cup cacao butter, warmed until melted
1/3 cup raw cacao powder
2 tbsp maple syrup
Pinch sea salt
DIRECTIONS
In a food processor, process all filling ingredients till well combined. It will be a little wet, but they will stick together well once you chill it.. Shape the filling into twelve mini bit size rectangles. Place them on a parchment lined baking pan and refrigerate for 30 minutes.
Set up a double boiler, using a medium sized mixing bowl. Melt the cacao butter, then whisk in the cacao powder, syrup, and sea salt.
Take each mini coconut bar and dip it into the chocolate coating, quickly placing it back on the parchment. Return them to the fridge for 10-15 minutes, or until one coating has set. Repeat the process again, so that each has a double coat.
Return them to the fridge for another 15 minutes, or more to let them set. When ready to serve, let them sit outside the fridge for about 10-15 minutes.
Share this:

Tags: almond, almond joy, chocolate, coconut, dessert, healthy dessert, raw, raw dessert, vegan, vegan dessert
- 3 comments
- Posted under Chocolate, Sweet

