Category Archives: Cookies
April 20, 2014 Slow as Molasses
“Senioritis” has hit pretty hard this semester — I’ve often joked that I’m “as slow as molasses” lately.

Though it’s been a little tricky to stay motivated with graduation quickly approaching and the beautiful spring weather we’ve been experiencing, finals are still around the corner and there are many late nights at the library still ahead. I don’t know about you, but study snacks help my concentration infinitely — however, I wanted to make something that wouldn’t leave me feeling completely guilty and sugar-high.

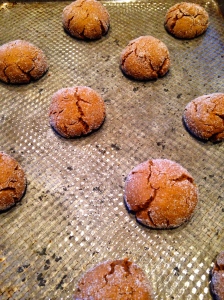
And thus, I recently made Vegan Molasses Cookies — they’re excellent. They’re chewy and spicy, and taste best when completely cool (if you can wait that long, haha).
- ⅓ c. Earth Balance, melted
- ½ c. sugar
- ¼ c. brown sugar, packed
- ⅓ c. blackstrap molasses
- 2 t. vanilla extract
- 2 T. soy milk
- 2 c. all-purpose flour
- 1 t. ginger
- 1 t. cinnamon
- ½ t. cloves
- ½ t. allspice
- 2 t. baking soda
- In a medium sized mixing bowl, cream together the vegan butter and sugars with an electric mixer until smooth and well blended.
- Add the molasses, vanilla, and milk and beat until the mixture is very smooth.
- In a separate bowl, whisk together the remaining ingredients.
- Pour the dry ingredients into the wet and mix just until everything is well combined.
- Cover the dough with plastic wrap and refrigerate for an hour.
- When you’re ready to shape the cookies, preheat the oven to 350 degrees.
- Remove the dough from the refrigerator and use a cookie scoop or large spoon to measure out about a tablespoon or so of dough for each cookie. Roll each scoop of dough into a smooth ball with your hands and roll in additional sugar if desired.
- Place the balls onto lightly greased baking sheets and bake for 8-10 minutes, or until the surface of the cookies have nicely cracked.
Share this:

Tags: cookies, dessert, ginger, ginger cookies, healthy, molasses, molasses cookies, vegan, vegan cookies, vegan desserts
- Leave a comment
- Posted under Cookies, Sweet
December 2, 2012 The Perfect Combo


Looks definitely do not do this cookie justice. True to their name, they are the perfect mix between a cookie and a brownie (fudgy, crispy, AND chewy, all at the same time), and the deep chocolate flavor really comes through. If you’re planning to make these (which you should be), make sure to keep in mind that you MUST freeze the dough for an hour before baking.
Chocolate Brownie Cookies – Belinda Leong (Food and Wine Magazine)
Ingredients:
- 1 pound semisweet chocolate, chopped
- 4 tablespoons unsalted butter
- 4 large eggs, at room temperature
- 1 1/2 cups sugar
- 1 teaspoon pure vanilla extract
- 1/4 teaspoon salt
- 1/2 cup all-purpose flour, sifted
- 1/2 teaspoon baking powder
- One 12-ounce bag semisweet chocolate chips
Directions:
- In a large bowl set over a saucepan of simmering water, melt the chopped chocolate with the butter, stirring a few times, until smooth, about 7 minutes.
- In another large bowl, using a handheld electric mixer, beat the eggs with the sugar at medium speed until thick and pale, about 5 minutes. Beat in the vanilla and salt. Using a rubber spatula, fold in the melted chocolate, then fold in the flour and baking powder. Stir in the chocolate chips. Scrape the batter into a shallow baking dish, cover and freeze until well chilled and firm, about 1 hour.
- Preheat the oven to 350° and line 2 baking sheets with parchment paper. Working in batches, scoop 2-tablespoon-size mounds of dough onto the prepared baking sheets, about 2 inches apart. Bake for about 10 minutes, until the cookies are dry around the edges and cracked on top. Let the cookies cool on the baking sheets for 10 minutes, then transfer to a rack to cool completely before serving.
Share this:

Tags: brookies, brownies, chewy, cookies, food and wine, gooey
October 20, 2012 Coming Clean


A long time ago, I posted a recipe for biscotti. I raved about how good they were, and encouraged all of my readers to make them, as well. The guilt has been eating me up, and I think it’s finally time for me to come clean — they were terrible. I was VERY new to blogging at the time, and I was so embarrassed by what a catastrophe they were (my mom swears she almost broke a tooth) so I did what any immature teenager would do: lie. Thankfully, I’ve come a long way since that post.
When I was home for fall break last week, it was only natural for me to bake something, and this time I knew exactly what it was I was meant to bake. I re-attempted the biscotti (albeit a different recipe), and this time, I can assure you that they were FANTASTIC! My family could not stop raving about these delightful coffee dunkers… so much so that I had to make a second batch (in the same day). These were MUCH easier to make than I expected, and I know I will be making these again soon.
Double Chocolate Walnut Biscotti – Gourmet Magazine, 1994
yield: 30
Ingredients:
- 2 cups all-purpose flour
- 1/2 cup unsweetened cocoa powder
- 1 teaspoon baking soda
- 1 teaspoon salt
- 3/4 stick (6 tablespoons) unsalted butter, softened
- 1 cup granulated sugar
- 2 large eggs
- 1 cup walnuts, chopped (I omitted these)
- 3/4 cup semisweet chocolate chips (I used milk chocolate for more of a flavor contrast)
Directions:
Preheat oven to 350°F. and butter and flour a large baking sheet.
In a bowl whisk together flour, cocoa powder, baking soda, and salt. In another bowl with an electric mixer beat together butter and granulated sugar until light and fluffy. Add eggs and beat until combined well. Stir in flour mixture to form a stiff dough. Stir in walnuts and chocolate chips.
On prepared baking sheet with floured hands form dough into two slightly flattened logs, each 12 inches long and 2 inches wide, and sprinkle with confectioners’ sugar. Bake logs 35 minutes, or until slightly firm to the touch. Cool biscotti on baking sheet 5 minutes.
On a cutting board cut biscotti diagonally into 3/4-inch slices. Arrange biscotti, cut sides down, on baking sheet and bake until crisp, about 10 minutes. Cool biscotti on a rack. Biscotti keep in airtight containers 1 week and frozen, 1 month.
Share this:

Tags: biscotti, chocolate, cookies, double chocolate, italian
June 4, 2012 A Camping We Will Go


I can’t think of another treat that epitomizes summer (or summer camp) more than the traditional s’more. So, as I prepare for my ten weeks at summer camp (working, of course!), I thought I’d share a recipe that exudes all of the summer flavors and memories of a s’more, but that can be enjoyed year-round.
Chocolate-Covered Marshmallow Cookies – Martha Stewart
Ingredients:
- 1/4 cup plus 2 tablespoons all-purpose flour (spooned and leveled), plus more for working
- 1/4 cup plus 2 tablespoons whole-wheat flour (spooned and leveled)
- 1/4 teaspoon coarse salt
- 1/4 teaspoon baking soda
- 1/4 teaspoon baking powder
- 1/4 teaspoon ground cinnamon
- 3 tablespoons unsalted butter, room temperature
- 3 tablespoons packed light-brown sugar
- 1 large egg
- 9 large marshmallows, halved
- 9 ounces semisweet chocolate, coarsely chopped
Directions:
- Preheat oven to 350 degrees, with racks in upper and lower thirds. In a medium bowl, whisk together flours, salt, baking soda, baking powder, and cinnamon. In a large bowl, using an electric mixer, beat butter and brown sugar on high, scraping down bowl as needed, until light, 4 minutes. Add egg and beat to combine, scraping down bowl as needed. With mixer on low, gradually add flour mixture and beat until combined.
- Drop dough by tablespoonfuls, 3 inches apart, onto two parchment-lined baking sheets. With the bottom of a measuring cup dipped in flour, flatten cookies to 2 inches in diameter. Bake until dry and set, about 7 minutes, rotating sheets halfway through. Remove from oven and top each cookie with a marshmallow half. Bake until marshmallows are soft, 2 minutes.
- Remove from oven and, with a metal spatula, gently flatten each marshmallow. Let cookies cool completely on sheets on wire racks.
- Place chocolate in a medium heatproof bowl set over (not in) a saucepan of simmering water. Stir until melted, 2 minutes. Remove bowl from pan. Place one cookie at a time on tines of a fork, submerge in chocolate, then tap fork on edge of bowl to remove excess. Place on wire rack set over a baking sheet. Let cookies set in refrigerator, about 10 minutes.
Share this:

Tags: chocolate covered marshmallows, cookies, martha stewart, smores
March 25, 2012 Breakfast for Dessert?


Completely smitten with the Crack Pie and Compost Cookies that I had once attempted, I decided it was necessary that I try another Momofuku Milk Bar favorite: Cornflake Chocolate Chip Marshmallow Cookies. The flavor was similar to that of the compost cookies, but these cookies were much thinner and crisper (my favorite!).
Cornflake Chocolate Chip Marshmallow Cookies – Momofuku Milk Bar, Christina Tosi
Ingredients
16 tbsp. (2 sticks) room-temperature butter
1¼ c. granulated sugar
2/3 c. light brown sugar, tightly packed
1 egg
½ tsp. vanilla extract
1½ c. flour
½ tsp. baking powder
½ tsp. baking soda
1½ tsp. kosher salt
3 c. Cornflake Crunch
2/3 c. mini chocolate chips
1¼ c. mini marshmallows
1. In the bowl of a stand mixer fitted with the paddle attachment, combine butter and sugars; cream together on medium-high 2-3 minutes. With a spatula, scrape down sides of bowl, then add egg and vanilla and beat 7-8 minutes.
2. Reduce speed to low; add flour, baking powder and soda, and salt. Mix just until dough comes together, no longer than 1 minute. (Do not walk away from the machine during this step or risk overmixing.) Scrape down sides of bowl.
3. Still on low speed, paddle in cornflakes and chips until just incorporated, about 30-45 seconds. Paddle in marshmallows.
4. Line a sheet pan with parchment paper. Using a 2-oz. ice cream scoop, portion 1/3 c. dough at a time onto pan. Pat tops of dough domes flat. Wrap pan tightly in plastic wrap and refrigerate for at least 1 hour or up to 1 week. (Do not bake room-temperature disks — they will not hold their shape.)
5. Heat oven to 375°. On a parchment- or Silpat-lined sheet pan, arrange chilled disks a minimum of 4 inches apart. Bake 18 minutes, until cookies are browned on edges and just beginning to brown toward the center. Cookies will puff, crackle, and spread. Leave them in oven for another minute or so if they still seem pale and doughy on the surface.
6. Cool cookies completely on pan before moving them to a plate or an airtight container for storage. At room temperature, cookies will keep fresh for 5 days; in the freezer, they will keep for 1 month.
Share this:

Tags: cookies, cornflake, marshmallow, momofuku
- Leave a comment
- Posted under Cookies, Sweet
February 2, 2012 A new take on chocolate “chip” cookies


True to their name, these cookies do have chips in them… potato chips that is. A cross between a pecan shortbread cookie and a chocolate covered potato chip, this “new” take on the chocolate chip cookie will soon become an “old” favorite (and they were easy to make!).
Potato Chip Cookies – Smitten Kitchen (adapted from Emeril)
Cookie
1 cup unsalted butter, at room temperature
1 cup granulated sugar, divided
1 teaspoon pure vanilla extract
1/4 teaspoon table salt
1/2 cup chopped and toasted pecans
1/2 cup finely crushed potato chips
2 cups all-purpose flour
Potato chip salt finish (optional)
1 tablespoon crushed potato chips
1 1/2 teaspoons flaked sea salt
Chocolate dip finish (optional)
4 ounces semi- or bittersweet chocolate, finely chopped
1 teaspoon butter, canola oil or vegetable shortening
Preheat your oven to 350 degrees F. Line two baking sheets with parchment paper and set aside. In a large bowl, cream together the butter with 1/2 cup of the sugar until lightly and fluffy. Mix in the vanilla and table salt, if using, until smooth. Add the pecans, 1/2 cup crushed potato chips and flour together and mix until just combined.
Place the remaining 1/2 cup sugar in a small bowl. Scoop a tablespoon-sized mound of dough and form it into a small ball with the palms of your hands. Roll the ball in the remaining sugar until coated. Place on prepared baking sheet and using the bottom of a drinking glass to slightly flatten the cookies. Cookies only need to be an inch apart; they only spread a little. Sprinkle with a few flakes of the potato chip salt, if using. Repeat with remaining dough.
Bake cookies until lightly golden at the edges, about 15 minutes. Transfer to cool on a wire rack.
If dipping in chocolate, melt chocolate with butter, oil or shortening in a double boiler or in short bursts in the microwave. Stir until smooth. Dip half of each fully cooled cookie in the chocolate, and let dry and harden on a wire rack.
Share this:

Tags: chocolate chip cookies, potato chip cookies, sweet and salty
- Leave a comment
- Posted under Cookies, Sweet
January 1, 2012 Hidden Treasure


When I was a little girl, I used to list “treasure-hunting” as one of my favorite hobbies. You might be thinking that I was a very imaginative child, one who pretended she was a pirate searching for gold; if this is what you would think, then you would be wrong. In my youth, treasure hunting was so much more than a make-believe game, in fact, it was not a game at all. Treasure hunting was going to my grandma’s house, which appeared both beautiful and orderly (but like many things, appearances can be deceiving), and looking for “treasures” amongst 50 years worth of clutter. What once started as an opportunity for me to collect more “things,” looking through various drawers and boxes to find little knick knacks and odds and ends (or my mom’s senior prom pictures that she refuses to let me bring into the house), turned into an opportunity for me to collect real, hidden treasures — the stories my grandma would tell me about all of the objects I found. Some of my greatest finds, a beautiful beaded wallet, launched stories about a babysitter my mom and her siblings once had, and a t shirt from france (which I wore until there were holes in about every place imaginable), became the springboard for stories about my grandparents’ travels.
Surprisingly enough, in the three years that I have been writing this blog, I have neglected to share one of my family’s hidden culinary treasures: Mema’s Mandel Bread recipe. Though it might seem simple to an outsider, like the “treasures” I used to seek in my grandma’s basement, to me, it truly is one of the most special cookies I have ever tasted.
Mema’s Mandel Bread – Ann Benderoff
Ingredients:
-3 eggs (at room temperature)
-1 scant cup of sugar
-1 cup mazola oil
-3 cups flour (Gold Medal, pre-sifted)
-2 tsp pure vanilla extract
-cinnamon sugar mixture, to sprinkle at the end
Directions:
1. Preheat the oven to 350 degrees.
2. Beat eggs.
3. Add sugar and mix.
4. Add oil and vanilla and mix.
5. Add flour and mix.
6. Oil hands and mold dough into 2 long logs.
7. Bake for 30-35 minutes, until lightly browned.
8. Slice the logs and put the individual cookies on a cookie sheet, sprinkle with cinnamon sugar, and return cookies to the oven to bake again until firm and crisp (watch carefully to make sure they don’t burn).
note: This is a basic recipe — many people choose to add chocolate chips, dried fruits, or nuts, but our family likes it plain.
Share this:

Tags: cookies, jewish, mandel bread
- 5 comments
- Posted under Cookies, Sweet
June 6, 2011 Not Your Grandma’s Lemon Bars


In my opinion, lemon bars are nothing to get excited about. Fortunately, this lemon bar is not your average lemon bar. To start, there’s no chalky, tasteless crust; even better, there’s no filling that is simultaneously lip-puckeringly tart and cloyingly sweet; my favorite part, they’re not drenched in powdered sugar. Instead, the crust is perfectly buttery and crumbly, its warmth only enhanced by the presence of the toasted coconut, and the lemon filling is smooth and delicate. These bars were not what I was expecting, but let me assure you, I was pleasantly surprised.
Lemon-Coconut Bars – Bon Appetit
Ingredients:
CRUST:
- 1 cup all purpose flour
- 1/4 cup sugar
- 1/4 teaspoon salt
- 3/4 cup sweetened flaked coconut, toasted, cooled
- 6 tablespoons (3/4 stick) chilled unsalted butter, cut into 1/2-inch cubes
FILLING:
- 3/4 cup sugar
- 2 large eggs
- 1/4 cup fresh lemon juice
- 1 tablespoon (packed) finely grated lemon peel
- 1 teaspoon all purpose flour
- 1/2 teaspoon baking powder
- Pinch of salt
Directions:
For crust:
Preheat oven to 350°F. Line 8x8x2-inch metal baking pan with foil, leaving overhang. Butter foil. Combine flour, sugar, and salt in processor; blend 5 seconds. Add coconut and butter; process until mixture resembles fine meal and begins to clump together. Gather dough into ball. Press dough evenly over bottom of prepared pan. Bake crust until golden at edges, about 25 minutes.
Meanwhile, prepare filling:
Combine 3/4 cup sugar, eggs, lemon juice, lemon peel, flour, baking powder, and salt in processor. Blend filling until smooth.
Remove crust from oven. Pour filling evenly over hot crust. Return to oven and bake until filling begins to brown at edges and is just set and springy to touch in center, about 30 minutes. Transfer pan to rack; cool lemon bars completely.
Using foil as aid, transfer lemon bars to work surface. Flatten foil edges. Cut into 16 bars. Sift powdered sugar over. (Can be made 5 days ahead. Store airtight in single layer in refrigerator.)
Share this:

Tags: coconut, grandma, lemon, lemon bar, toasted coconut
March 13, 2011 It is always with the best intentions…
… that the worst work is done. – Oscar Wilde.


Oscar Wilde really knew what he was talking about…I intended for this recipe to be “kind of a big deal,” to steal a line from Anchorman. I thought it was going to be a showstopper, leaving everyone in awe. Unfortunately, it did not entirely live up to my expectations; the chips were not quite hard enough, and the cookies themselves were overly dense, and a little too sweet. I will definitely come back to it in the future, however, as it has SO much potential. Whose mouth doesn’t water at the thought of homemade NUTELLA CHIP cookies?! I followed the advice of the recipe to chill the dough for 36 hours, but I think if I were making this again I would not chill the dough, because I like a slightly thinner cookie (chilling helps it to spread less). Also, I might put a little less sugar in the dough just because I like a slightly less-sweet cookie.
In the meantime:
Homemade Nutella Chips – ivoryhut.com
Makes about 2 cups
Using the added milk chocolate chips gives the chips more structure and creaminess but it also mutes the hazelnut flavor. If you don’t mind a subtler Nutella flavor or if you will boost the flavor of the cookies with added toasted hazelnuts or ground hazelnuts, feel free to replace the butter with even more milk chocolate chips.
6.5 oz. Nutella
2 oz. butter
3 oz. milk chocolate chips (optional)
In a double boiler or a glass bowl set over a pot of simmering hot water, melt all the ingredients until you have a smooth, glossy chocolate mixture, about 3 to 5 minutes. Be careful not to burn the chocolate. Take the mixture off heat.
To make chunks, spread in a 1/8-inch thick layer on Silpat or foil and freeze for at least 2 hours. When frozen solid, break into chunks with a knife (try not to handle the chocolate too much or the heat of your hands will start to melt it). Store in the freezer until ready to use.
To make chocolate chips or discs, put the melted chocolate inside a pastry bag or resealable bag with a corner snipped off. Pipe out the discs or chips onto a baking sheet lined with Silpat or a sheet of foil. When done, put the sheet in the freezer and freeze for at least 2 hours. When frozen solid, loosen the chocolate chips and store in a bag or airtight container in the freezer until ready to use.
Nutella Chip Cookies with Homemade Nutella Chips – ivoryhut.com, adapted from America’s Test Kitchen’s Perfect Chocolate Chip Cookies
1 3/4 cups unbleached all-purpose flour
1/2 teaspoon baking soda
1 3/4 sticks butter
1/2 cup granulated sugar
3/4 cup packed dark brown sugar
1 teaspoon table salt
2 teaspoons vanilla extract
1 large egg, plus 1 egg yolk
1 1/4 cups homemade Nutella chips
3/4 cup chopped hazelnuts, toasted (optional)
Combine flour and baking soda in a bowl. Whisk and set aside.
Melt 1 1/4 sticks butter in a skillet over medium-high heat. Keep swirling until butter has a dark golden brown color and a nutty aroma, about 1 to 3 minutes. Transfer it to a bowl and mix in the remaining butter until melted.
Add the sugars, salt, and vanilla to the butter and mix well. Add the egg and the extra yolk; whisk until smooth, about 30 seconds. Let it rest for 3 minutes, then whisk again for about 30 seconds, before letting it rest again. You’ll want to whisk this about 4 times, until you have a thick, glossy, and smooth mixture.
Gently stir in the flour and baking soda just until combined. Make sure dough is cool before stirring in the Nutella chips and nuts, if using.
Cover the dough with plastic wrap and store in the refrigerator for 24 to 36 hours.
Preheat oven to 375 degrees. Form dough balls about 3 tablespoons in size (I use an ice cream scoop) and place them on a lined baking sheet about 2 inches apart. Bake at 375 degrees for 14–16 minutes (mine took 15 minutes), then put the baking sheet on a cooling rack and let the cookies cool on the sheets.
Share this:

Tags: brown butter, cookie, nutella, oscar wilde
- Leave a comment
- Posted under Chocolate, Cookies, Sweet
March 8, 2011 when life gives you lemons


Both my mom and my grandma called me last week to rave about a lemon ricotta cookie they had shared at Nordstrom. I didn’t try the Nordstrom cookie, but from what they described, it sounded like something I wanted to make, especially to redeem myself in the lemon dessert category (think back to my first flop). I found Giada’s recipe online and decided I would try it out. Both generations agreed that this recipe was different, but like mother, like daughter (and granddaughter!), they also agreed that these cookies were every bit as delicious. These would be great with coffee or tea, as they have a scone-like texture.
Lemon Ricotta Cookies with Lemon Glaze – Giada De Laurentiis
Ingredients
Cookies:
- 2 1/2 cups all-purpose flour
- 1 teaspoon baking powder
- 1 teaspoon salt
- 1 stick unsalted butter, softened
- 2 cups sugar
- 2 eggs
- 1 (15-ounce) container whole milk ricotta cheese
- 3 tablespoons lemon juice
- 1 lemon, zested
Glaze:
- 1 1/2 cups powdered sugar
- 3 tablespoons lemon juice
- 1 lemon, zested
Directions
Preheat the oven to 375 degrees F.
Cookies:
In a medium bowl combine the flour, baking powder, and salt. Set aside.
In the large bowl combine the butter and the sugar. Using an electric mixer beat the butter and sugar until light and fluffy, about 3 minutes. Add the eggs, 1 at a time, beating until incorporated. Add the ricotta cheese, lemon juice, and lemon zest. Beat to combine. Stir in the dry ingredients.
Line 2 baking sheets with parchment paper. Spoon the dough (about 2 tablespoons for each cookie) onto the baking sheets. Bake for 15 minutes, until slightly golden at the edges. Remove from the oven and let the cookies rest on the baking sheet for 20 minutes.
Glaze:
Combine the powdered sugar, lemon juice, and lemon zest in a small bowl and stir until smooth. Spoon about 1/2-teaspoon onto each cookie and use the back of the spoon to gently spread. Let the glaze harden for about 2 hours. Pack the cookies into a decorative contain
check out BHTB as featured on http://sweet-as-sugar-cookies.blogspot.com/2011/03/sweets-for-saturday-8.html
Share this:

Tags: cookies, food network, giada de laurentiis, lemon, ricotta
- 3 comments
- Posted under Cookies, Fruit, Sweet

